CaveDiveMap
Survey underwater caves with an iPhone, a 3D-printed measuring wheel and the guideline you're already following. The wheel rides on the line, and the phone counts its turns, reads the compass on every rotation and draws a live map of the passage. No slate full of numbers.
The method
01Cave divers already survey by line survey. The permanent guideline is tied off at stations along the passage, and each stretch between two tie-offs is a shot. Each shot needs a length, a compass heading and a change in depth. At each station you also estimate how far the walls are: left, right, up, down (LRUD). Traditionally that means a knotted line or reel, a compass and a slate. CaveDiveMap automates the length and heading, and prompts you for the rest.
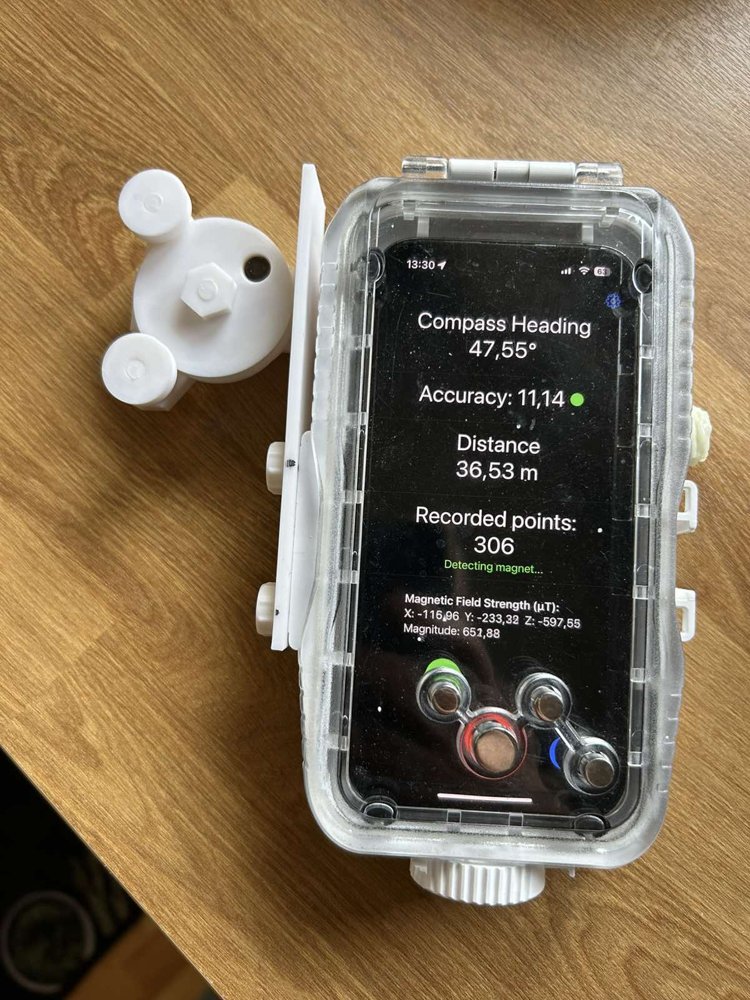
The wheel clamps round the guideline and rolls as you swim. A magnet in the wheel (or a slot, for the optical version) marks each turn:
Set the wheel diameter in Settings and check it against a measured length of line.
The compass heading is logged on every rotation, and again at the moment you save a station. Each shot's slope is removed using the depth change, then plotted north-up:
Example: a 6.4 m shot that rises 1 m covers 6.32 m on the plan.
App techniques
02The hard part is counting wheel turns reliably from inside a sealed housing, underwater, while the diver moves. The app offers three detection methods, and you can switch between them mid-survey without losing distance.
A small magnet in the wheel sweeps past the iPhone's magnetometer once per turn. The app counts a rotation when the field rises above a high threshold and then falls back below a low one. Using two thresholds stops noise near a single threshold from double-counting. A 10-second calibration with the wheel turning places the thresholds at 35 % and 65 % of the measured swing. It works on the total field or on a single axis.
Instead of watching for peaks, the app follows the magnet's field in 3D. Principal-component analysis finds the plane the field rotates in, and the app tracks the rotation angle within that plane, counting one rotation per full 360°. The angle is signed, so a wheel rocking back and forth on a taut line cancels out instead of adding false distance. The gyroscope and accelerometer mask out moments when the phone itself is being swung around.
For places where the magnetic environment is difficult (steel, magnetite, other kit), the rear camera and flashlight watch an optical encoder wheel with an opening that blocks and unblocks the light once per turn. Calibration meters the exposure on the turning wheel, locks it and stores it with the brightness thresholds, so every dive uses the same exposure. A live preview shows the brightness against the thresholds.
A separate mode with no wheel at all. ARKit fuses the camera and the motion sensors to track the phone's path and gather a sparse 3D point cloud
of the passage walls (LiDAR-like, with fewer points). SET N ties the scan to the compass, tracking gaps are never bridged, and the scan autosaves every minute and
saves a .ply when you stop. It works well in dry caves; underwater it needs good visibility and a light fixed to the housing.
Every record is written to disk as it's taken, so a crash or restart mid-dive loses nothing, and the distance carries on.
You can resize and move every button to suit your housing, and a few firm knocks on the housing return you to the main screen when the touchscreen is awkward.
Depth can go negative, meaning above the water line, so a sump survey links correctly to the dry cave beyond an air chamber.
Example dive
03Surveying a new section of a sump, start to finish:
- Before the dive. Mount the 3D-printed device on the housing. In Settings, enter the wheel diameter, pick a detection method and run its 10 s calibration with the wheel turning. Set the survey title and team for the Therion export.
- First tie-off (S0). Align the phone with the line and press the green button. The heading is captured at that moment; if the compass is inaccurate, the app shows "Move to calibrate" until you rotate the phone and the indicator turns green.
- Enter the station. Enter the depth from your dive computer and the left / right / up / down distances (sonar range finder or estimate). The +/− buttons step by 1 m, or 10 m when held, and the blue button cycles through the fields. Depth starts from the previous station's value.
- Swim the shot. Clamp the wheel round the guideline and swim. The app logs distance and heading on every rotation.
- Next tie-off. Unclip, rotate the phone to keep the compass calibrated, align with the line and save the next station. Repeat all the way along the line.
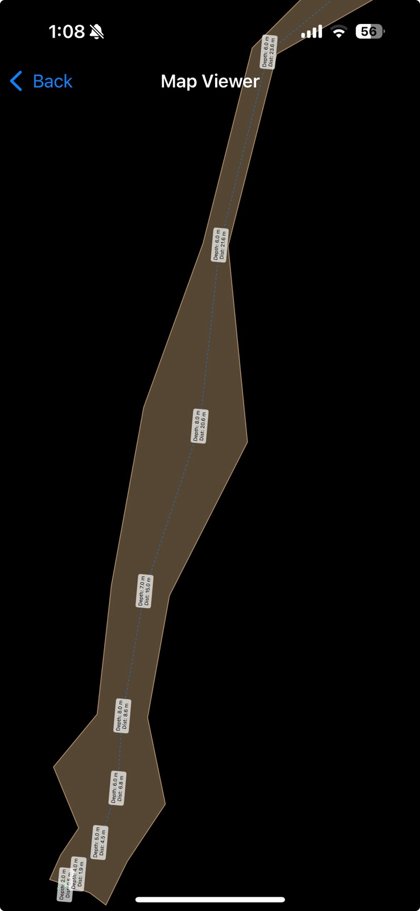
- Check the map at any time. The blue map button shows the centreline, shot lengths, depths and walls north-up. Pinch, twist and drag to explore, or drag wall points to refine them.
- After the dive. Export the survey from the map screen as CSV or as a ready-to-compile Therion centreline, and open it in your cave-survey software.
After the dive
04Therion centreline
The Therion export turns the stations you saved into a SavedData.thr file in diving style, with today's date and LRUD at both ends of every shot.
If you enter a depth change bigger than the measured shot length (easy with whole-metre depths on a short shot), the shot is exported as vertical and flagged with a comment,
because Therion would otherwise reject the whole file. Example with illustrative values:
survey sump_1 -title "Sump 1"
centerline
team "PaldinCaveDivingGroup"
date 2026.9.28
calibrate depth 0 -1
units length depth meters
units compass degrees
data diving from to length compass depthchange left right up down
extend left
0 1 2.00 22.0 2.0 [1.0 1.5] [1.0 1.0] [1.0 2.0] [1.0 1.0] # length raised from 1.90: shorter than its depth change
1 2 2.60 35.5 2.0 [1.5 2.0] [1.0 1.5] [2.0 2.0] [1.0 0.5]
2 3 2.30 14.0 0.0 [2.0 1.0] [1.5 2.0] [2.0 1.5] [0.5 1.0]
3 4 6.40 12.0 -1.0 [1.0 2.5] [2.0 3.0] [1.5 2.0] [1.0 1.0]
endcenterline
endsurvey
Other outputs
| Format | Contents |
|---|---|
| CSV | every record: auto points + stations |
| Therion .thr | centreline with LRUD |
| PLY | VIO point cloud |
| plan map from a point cloud |
Point clouds from the VIO mode can be viewed in the app in 3D, plan or profile and exported as a PDF map, or rendered on a computer with the included Python tool:
# desktop: point cloud → plan map
pip install numpy matplotlib shapely scipy plyfile
python tools/PointCloud2Map.py pointcloud.ply --out cave_map.pdf
# --alpha sets how tightly the wall outline hugs the points (default 0.6)
Reset: hold the red button for 3 s. A timestamped CSV backup is written to the Files app first.
Hardware
05A measuring wheel with a magnet cavity, a guideline clamp and a mount for the iPhone housing. Fully 3D-printable, with no springs, screws or special hardware. STL/3MF and Fusion 360 sources are included.
- Rubber band to tension the clamp
- 8 mm magnet (drill the cavity out for a bigger one)
- Optional: a ring of bike inner tube on the wheel for grip
iPhone on iOS 18+ in a waterproof housing. Tested with the DiveVolk SeaTouch 4. Written in Swift / SwiftUI. Build from source in Xcode (the sensors don't work in the simulator).
Free and open source, with no licence restrictions: use everything for anything you want.